By the way the roof project is a different project which you can see at http://roofprojectfotthecruiser.blogspot.com/
Pic of the fantastic fan. I'm on the ladder did not get on the roof. Making sure of attachment. The storage where I keep the Beast.
Please note I have the camera in my hand taking this pic, usually I bend over grab the railing just to be careful. If I'm bring something up can set on top and still get on top with no problem.
Pic of ladder I used. Wrapped the spots with double towels. I used my larger ladder, more stable than my small one. I moved the ladder to the rear same side, was able to step onto the roof easily and could use handles on the back for extra support. While on top of the RV no problem very solid. The RV would sway a little some with weight,wind. I was very careful anytime I stood walked slow. Did most work on my knees and sitting.
PLEASES NOTE. I wrote this as do it yourself. Getting on the roof of your RV is and can be dangerous. My Phoenix Cruiser has a railing on the rear which made it very accessible. The Cruiser is also built to hold someone on the roof. If you do not have railings it may be hard to get on the roof easily as I did. Again I did not want to use the ladder on my unit to put more stress on it. I would have no problem using it if needed.
After looking at Camping World decided to go with the AirMaxx vent. Cost was 30.00. I watched the video they had. Seemed fairly simple. Of course the guy doing the video is not on the roof of a RV haha.
I went to the Fantastic Fan site. The cover for their fan screws down on to the existing frame. So will keep an eye out for the covers on sale. The installation looks easy.
Pic of the fantastic fan. right hand side you can see the caulk where it is wavy, that is where it is covering the frame screw. According to video, remove the caulk, remove the screw, attached brackets. Cost 47.00 at CW right now.
After I started the roof project and looking at both fans (fantastic, bathroom, brand unknown (BRF)) I saw that the AirMaxx cover would not go on fantastic fan very easily. No problem on the BRF. Additionally after cleaning up both fans and looking at them the BRF was aging more anyway.
Picture of BRF before cleaning, plastic and gasket is showing some aging.
Fan is all cleaned up. greased up mechanism. Ready to start installation.
Brackets are attached, the frame around the fan is metal, had to drill small tapping hole first. Aligning brackets for right hand side was tricky.
Inside of fan frame, yes, had to re-drill one hole. Said it was tricky. Note yellowing of plastic frame and gasket. Not sure why. The fantastic fan looked great, no degrading of plastic gasket etc. I did put some caulk on the empty hole.
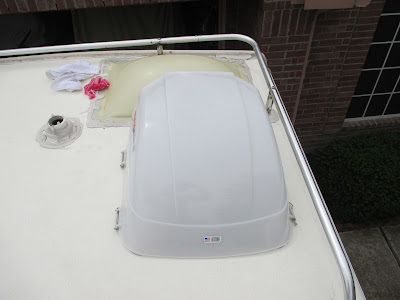
Fan cover installed.. cover sits up about 1/8 of inch from roof, this is normal.. wonder if the wind blows through it while driving. According to the other site I read they all do this. You have to be able to open them to service the fan.
Inside bathroom, looking up at the cover. The cover is clear. Maybe is allows to much sun and uv in for degrading so much. The fantastic fan has a smoke cover.
NOTES: Not to hard of project. Installing the brackets took some work since you have to reach inside of the fan cover to get to the holes. Again first intention was to do the main fan, but after looking at both of them glad it worked out. The Airmaxx cover is set up to go over the fantastic fan, you use the same brackets and using two screws per bracket, drill into the frame and screw the bracket down that way. As noted earlier by buying the Fantastic fan vent cover will only have to remove some caulk, take out the screws in the mount, put them back in and attach cover very easy. So again will wait to see if I can get that cover cheaper. If not plan on putting that on the fall. Also will be cooler heats killing me on top of the Beast haha.


